Joints and Bones
Introduction to Rig Tools Joint Chains
To drive its splines and deformers, Contour Rig Tools provides its own joints and bones. Contour Joints are similar to Maya joints, in that they’re transforms that can be animated directly or driven by other parts of a rig. They even look a bit like Maya’s joints. Figure 1.
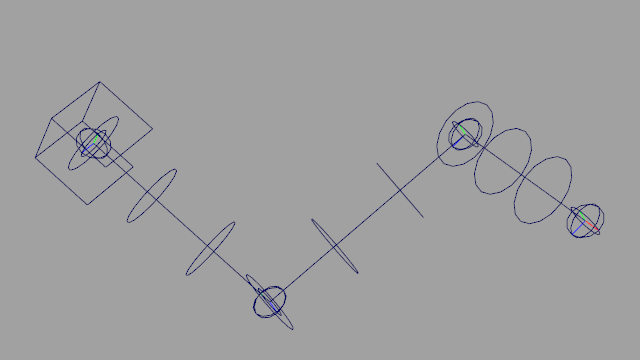
Figure 1
However, Contour Joints differ from Maya joints in fundamental ways, and offer functionality Maya joints don’t. We designed Contour so that, while it is possible to create a separate control structure and hide the joints from the animator, as is common in Maya rigs, it isn’t necessary to do so. Contour Joints are properly buffered for animation by default (ie. they can be zeroed out in every respect, including translation, without collapsing). Built-in rotation override makes it possible to rig them with optional inputs from a control rig—such as an IK handle—but still use the joints themselves for FK manipulation. And Rig Tools joint chains control Rig Tools splines in a way that offers clear visual feedback to the user.
To make this possible, a Rig Tools joint chain alternates between joints and bones, and its bones are actual nodes in the scenegraph that affect the behavior of the chain. Contour Bones act as a buffer for Contour Joints, and supply a concept of length that Maya’s joint chains lack. This length can be overridden and driven by a control rig just like joint rotation.
Joint Sockets and Chains
Every Rig Tools joint chain begins with a “Joint Socket,” which carries attributes that relate to the chain as a whole. These include settings that apply to the joints and bones within the chain, but also to the spline and deform field that the chain drives, such as the radius and density of the deform field. Figure 2.
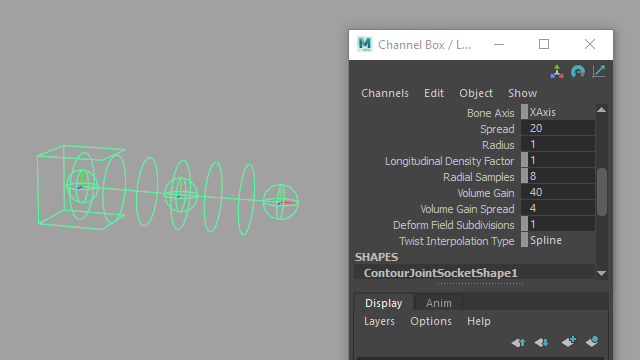
Figure 2
Under normal circumstances, a joint chain will drive a single spline and an associated deform field, and their behavior will be controlled by attributes on the joint socket. Figure 3.
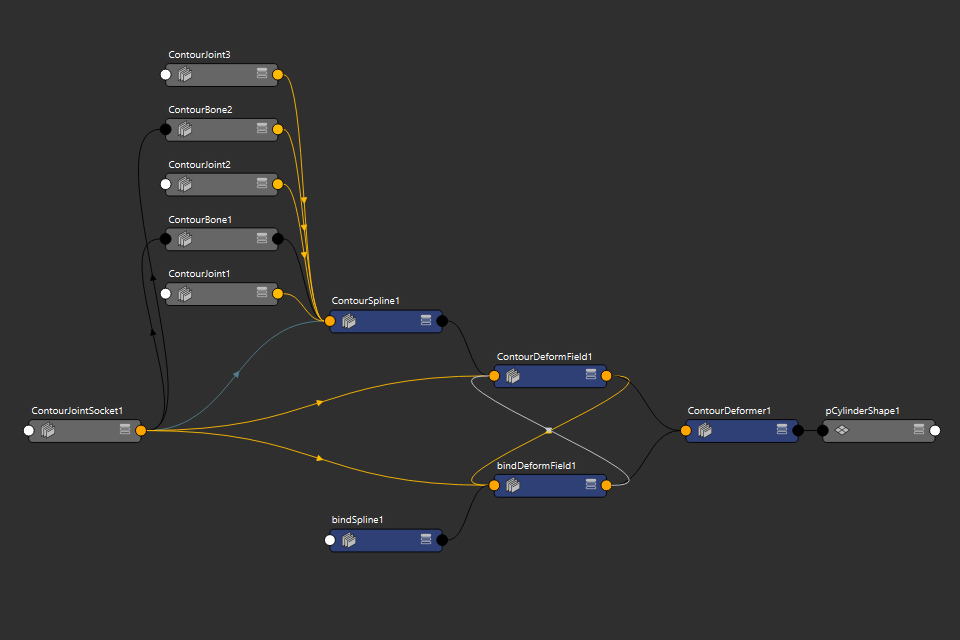
Figure 3
Joint sockets are also used by our tools any time you need to refer to a joint chain by selection, or in a call to our Python API. For instance, to create a deform field constraint for a joint chain you select the chain’s joint socket followed by the node you want to constrain.
Having a node you can always use to refer to a specific joint chain and its spline and deform field is important because Rig Tools joint chains are extremely flexible. Once a joint chain is created, it does not need to maintain its original hierarchy to remain a chain. You can insert transforms into the joint chain hierarchy, or parent joints or CVs to other hierarchies. In fact, a joint socket can become “childless,” without any joints or bones parented to it, and the chain will continur to work. The chain’s joint socket will still be used to refer to it, and to its spline.
Separate Joints and Bones
In addition to a joint socket, Rig Tools joint chains include both joints and bones. A Maya joint hierarchy is a simple list of joints: Figure 4.
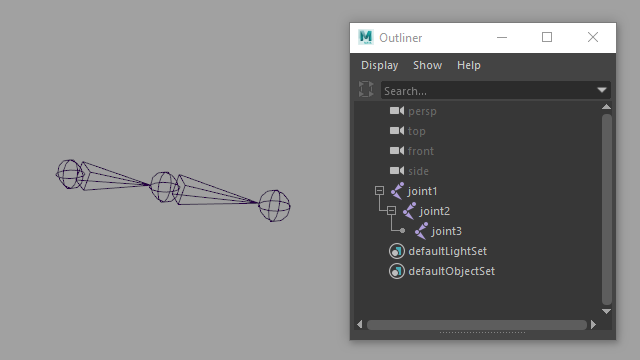
Figure 4
A Rig Tools joint chain, however, alternates between joints and bones: Figure 5.
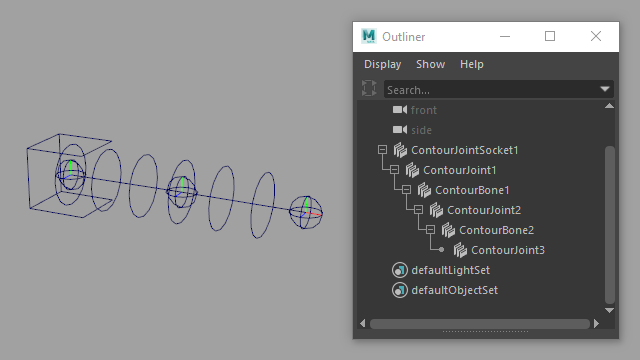
Figure 5
Rig Tools bones can’t be translated or rotated directly. Their purpose is to provide attributes relevant to the next joint in the chain. Figure 6.
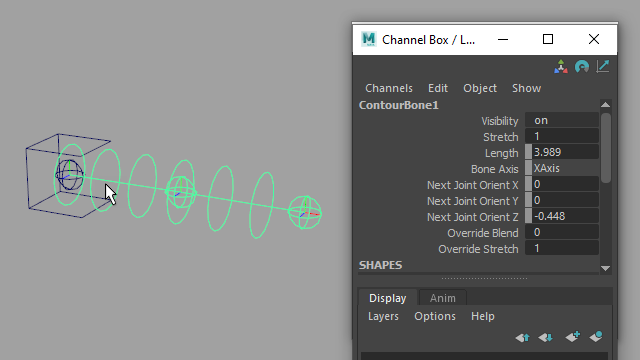
Figure 6
Every bone has a length, and that length defines how far from the previous joint the next joint in the chain will be positioned. Figure 7.
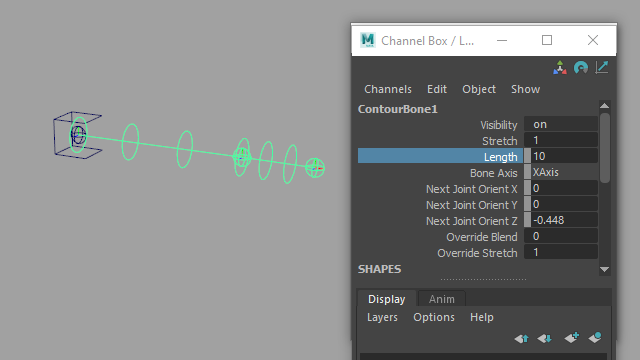
Figure 7
Each bone also has a “Next Joint Orient” attribute, which is similar to the “Joint Orient” attribute present on Maya joints, but affects the following joint in the chain. Figure 8.
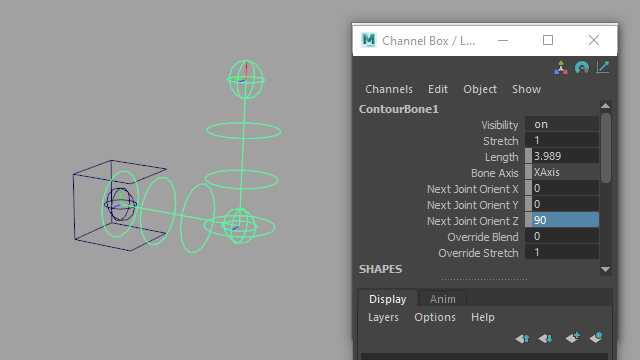
Figure 8
Between the Length and Next Joint Orient attributes, a bone completely buffers the joint that comes after it; a joint will return to its default position when its translate and rotate values are zero. Maya joints buffer their own rotation (through the Joint Orient attribute) but do not buffer translation at all; returning a Maya joint’s translate values to zero does not return it to its default position, but instead collapses the joint chain.
In addition to a Length attribute, Rig Tools bones have a Stretch attribute that multiplies the bone’s length. This makes it very easy to create rig behavior that stretches the bone, without losing information about its default length. Figure 9.
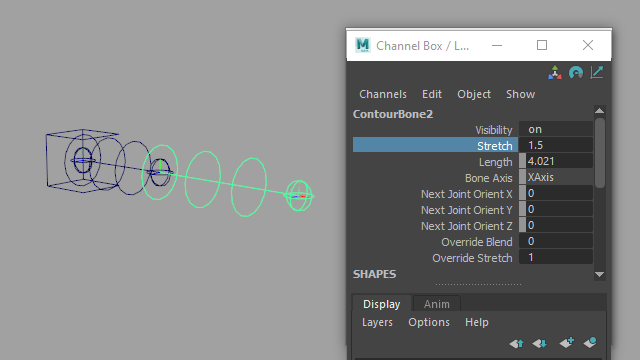
Figure 9
To define which axis the bone points down, each joint chain has a Bone Axis attribute, found on its joint socket. Figure 10.
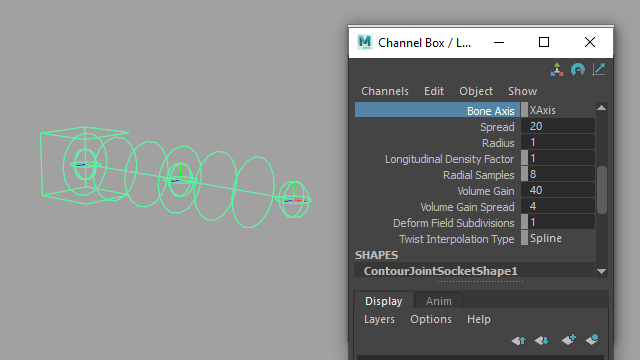
Figure 10
Rig Tools joint chains default to pointing down the X axis, as this is most appropriate for an XYZ rotation order. If using Y or Z as the bone axis, rotation order should be changed accordingly.
Rig Tools bones also support negative bone axes, which is important for properly mirroring transforms. We usually assume a positive bone axis on a character’s left side (e.g. +X) and a negative bone axis on its right (ie. -X), but this is only a convention and other arrangements are possible.
Joint Chain Radius
Rig Tools joint chains also have a radius, visually indicated by the rings surrounding the spline. The Radius attribute is found on the joint socket, as it applies to the entire joint chain. Figure 11.
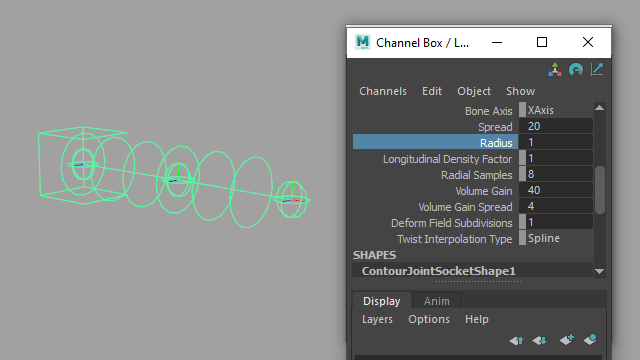
Figure 11
A chain’s radius is important information for the Rig Tools deformer, reflecting the approximate radius of the geometry being deformed. For instance, a wide pipe might require a different deformation than a skinny wire. The radius should be adjusted so that it is as close as possible to the average radius of the geometry deformed by the chain. If the geometry varies greatly in radius, err on the side of the largest radius. Figure 12.
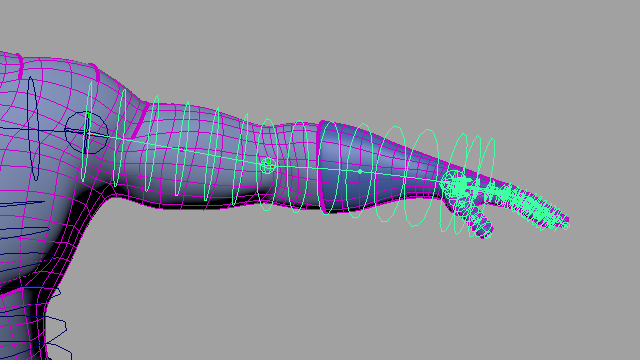
Figure 12
Once your joint chains’ radiuses have been adjusted the radius indicators are usually no longer needed. Its display can be toggled with Rig Tools ► Bones ► Disable Radius Indicator for All Bones and Rig Tools ► Bones ► Enable Radius Indicator for All Bones.
Using the Rig Tools Joint Tool
Like Maya, Rig Tools includes a tool for drawing joints. Unlike Maya, this tool can also be used to modify joint chains after they have been drawn, or while they are being drawn.
Starting a New Joint Chain and Adding Joints
To begin creating a new joint chain, choose Rig Tools ► Bones ► Rig Tools Joint Tool from the menu, and control-click in the view. A joint socket and joint will be created. Figure 13.
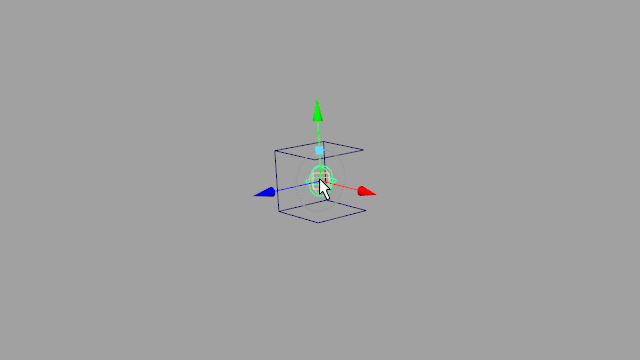
Figure 13
Clicking and dragging will reposition the joint, while control-clicking will add a new joint to the chain. New joints may be added to a chain at any time by selecting the last joint in the chain and control-clicking with the Rig Tools Joint Tool active. If a joint in the middle of the chain is selected, a new joint will be inserted between the selected joint and the next joint in the chain. Figure 14.
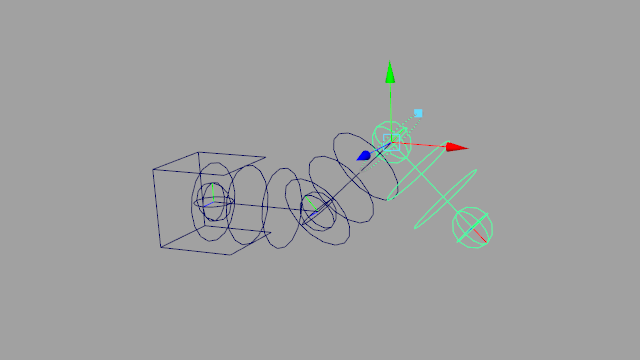
Figure 14
Repositioning Joints
While the Rig Tools Joint Tool is active, selecting any joint in the chain will allow you to reposition it. Using the Rig Tools Joint Tool to reposition joints actually modifies the Next Joint Orient and Length values of the bones in the chain, keeping the joint’s transforms zeroed out. Figure 15.
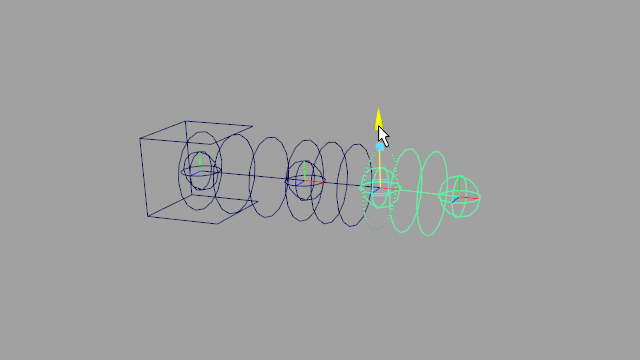
Figure 15
You can use any of Maya’s snapping modes when respositioning joints, including “Snap To Projected Center”. However, control-clicking to add new joints does not respect snapping modes. To make a newly created joint snap, simply reposition it immediately after placing it.
While a joint is selected and the Rig Tools Joint Tool is active, the selected joint will be surrounded by a circular manipulator that can be used to “roll” the joint. By repositioning and rolling joints visually you can fully define the orientation of any joint in a chain without leaving the tool. Figure 16.
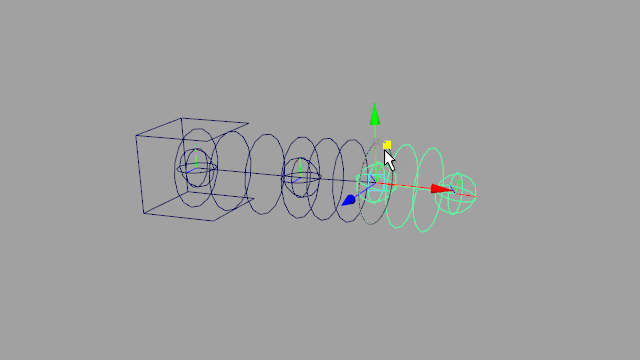
Figure 16
Modifying Joint Chains
Duplicating Joint Chains
Simply using Maya’s duplicate command on a Rig Tools joint chain won’t work properly—the specified bone and joint nodes will be duplicated, but they will not include the connections they need to function as a Rig Tools joint chain. Instead, joint chains must be duplicated using the Duplicate Joint Chain command.
To use this command, select one or more joint sockets and choose Rig Tools ► Bones ► Duplicate Joint Chain. All selected chains will be duplicated, along with any nodes parented to any joint or bone within that chain. If another joint chain is parented to a joint or bone in the chain, it will be duplicated as well.
Mirroring Joint Chains
Joint chains can be mirrored across the X, Y, or Z axes with Rig Tools ► Bones ► Mirror Joint Chain. Choose the mirror axis in the option box associated with the “Mirror Joint Chain” command.
Mirroring works just as duplication does—you can select any number of joint chains, and they and anything parented to their constituent joints and bones (including other Rig Tools joint chains) will be mirrored. Mirrored bones receive a negative bone axis so that the rotation of joints is correctly mirrored. Figure 17.
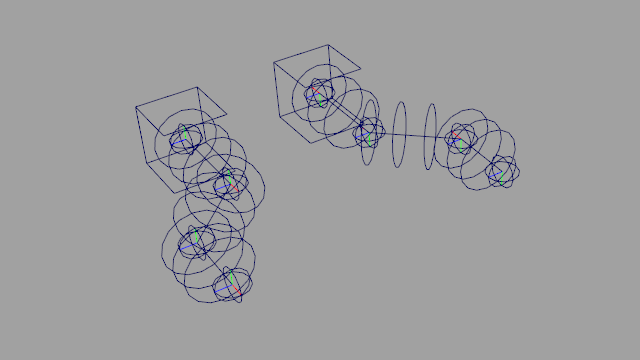
Figure 17
If using negatively scaled spaces for mirroring, the joint chain may instead be duplicated and then grouped under a negatively scaled space (for instance, one with scale values of -1,1,1.) This allows for true mirroring of both translation and rotation. Rig Tools has no problem with joint chains with non-uniform scale values, including negative values. Figure 18.
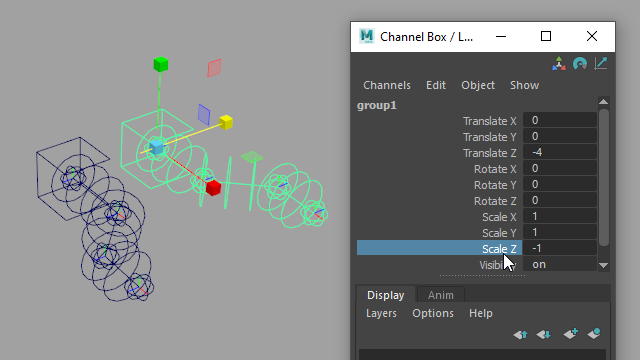
Figure 18
Adding and Deleting Joints and Bones
To add a joint to an existing chain, re-enter the Rig Tools Joint Tool and select any joint in the chain. Control-clicking will add a new joint immediately after the selected joint. Figure 19.
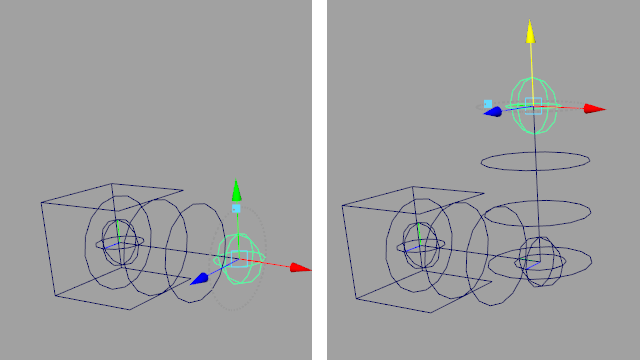
Figure 19
Alternatively, you can select any joint in a chain and use the Rig Tools ► Bones ► Add Joint And Bone to Chain command. A new joint will be added at the end of the chain if the selected joint is the last joint in the chain, or at the midpoint of the selected joint and the following joint if the selected joint is not the last joint in the chain. Figure 20.
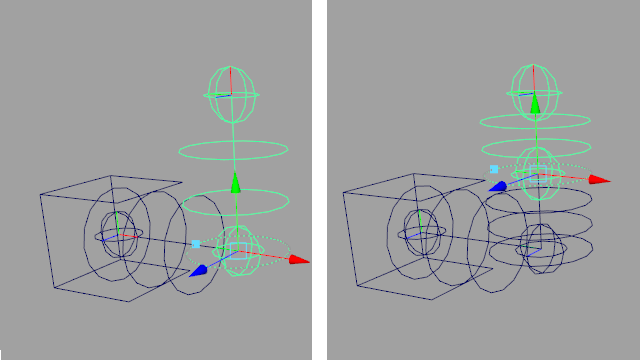
Figure 20
To delete a joint and its bone, you can enter the Rig Tools Joint Tool, select a joint, and press delete. You can also use the Rig Tools ► Bones ► Delete Joint And Bone from Chain command. Rig Tools will remove the joint and bone, and reorient the previous joint and bone to keep the chain pointing down the correct axis.
To remove an entire joint chain, select its joint socket and use the standard Maya Delete command.
Bone CVs
Unlike Maya bones, Rig Tools bones are not rigid. Since they ultimately control a spline that is used to deform the mesh, you can insert “Bone CVs” into a joint chain at any time. Bone CVs control the curvature of the spline between joints, and make bendy cartoon limbs, tentacles, ropes, and other tube-like objects very easy to rig. Figure 21.
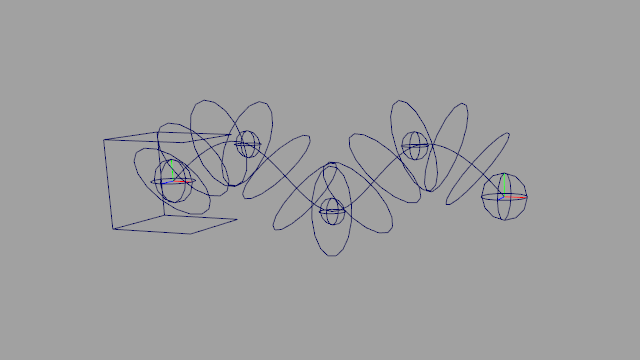
Figure 21
One big advantage of bone CVs is that they can be added at any time, even in a referenced rig. This means an animator can add CVs as needed on a per-shot basis without cluttering up the rig for other shots.
To add a bone CV to a bone, select a Rig Tools joint or Bone CV and choose Rig Tools ► Bones ► Add Bone CV. A new CV will be created, halfway between the selected node and the next joint or bone CV. You can add as many bone CVs as you want. Figure 22.
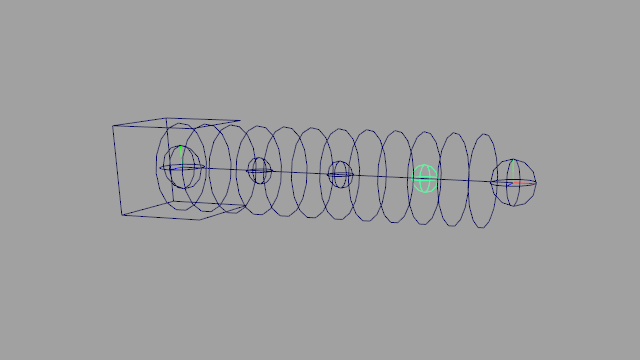
Figure 22
When you create a bone CV, it will have a “Bone CV Socket”. This socket buffers the bone CV, just as bones buffer joints, so that the CV will return to its default position when zeroed. When the bone is stretched, by changing its Stretch or Override Stretch attributes, the position of the bone CV socket along the bone axis will be scaled along with the bone. Figure 23.
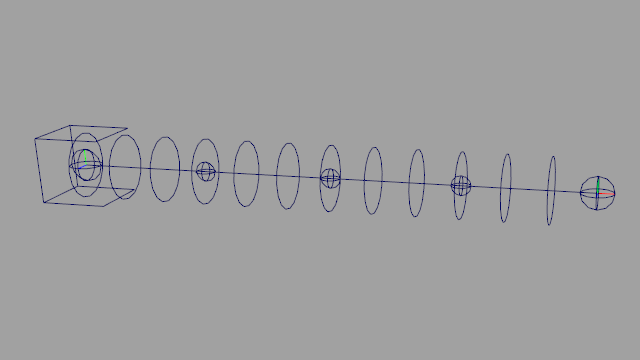
Figure 23
Bone CVs can be removed by choosing Rig Tools ► Bones ► Delete Bone CV from the menu.
Override Rotation and Stretch
Rigging often requires you to provide more than one way to control a joint—for instance, to allow for FK/IK switching. This is traditionally accomplished by creating a rig that blends between the effects of multiple control structures using constraints or math nodes.
Rig Tools joints and bones offer an alternative method that allows you to override joint rotation or bone stretch directly on the joint or bone, with built-in override and Override Blend attributes. Figure 24.
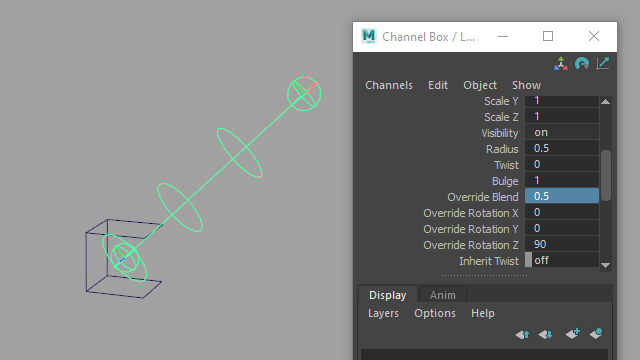
Figure 24
This reduces control rig complexity, and makes it viable to animate with the joints themselves as one control method. That’s how Rig Tools’ built-in IK handle works; the handle controls the joint’s rotation override, allowing you to animate the joint chain itself as FK controls when the IK handle is not active.
When not being used by an IK handle, the override can be linked to any attribute as needed. Internally, the joints use a quaternion slerp to perform the blend, equivalent to a blended orient constraint in “Shortest” mode. This makes it easy to link the values to a variety of inputs without worrying about gimbal issues when blending between the two.
There are some caveats when constraining to a joint with overridden rotation. See Constraining to a joint with rotation overrides.
Bone Display and Selectability
Because the joints and CVs are right on top of the bones, it’s easy to accidentally select a bone when trying to select a joint or CV. Rig Tools provides a menu option in the Rig Tools ► Bones menu to toggle all bones selectable or unselectable.
The bone radius indicators can also be visually confusing in a rig with lots of joint chains. Each bone shape node has a “Draw Joint Chain Radius” attribute that controls whether the radius indicators associated with that section of the spline are displayed. Figure 25.

Figure 35
The Rig Tools ► Bones menu also provides commands to globally show or hide the radius indicators for existing joint chains. New chains will still be created with the radius enabled.